#visual studio code tutorial
Explore tagged Tumblr posts
Visit Tumblr Blog
Explore Tumblr blogs with no restrictions, modern design and the best experience.
Last Seen Tumblr Blogs


Fun Fact
China blocked Tumblr because of pornography and censorship problems in 2013.
Text
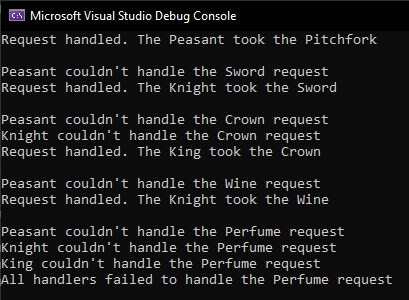
Coding tutorial: Chain-of-responsibility pattern
A peasant, knight and king walk into a software design tutorial, and are here to teach you the chain-of-responsibility pattern. Learn how to create a chain of handlers which can handle different request types.

This tutorial shows you how to code the chain-of-responsibility pattern in the Visual Studio development environment, using a console application and the C++ programming language.
The chain-of-responsibility pattern passes on a request to a chain of handlers one at a time. Each handler can handle different requests. So if the first handler can’t handle the request, then it will pass it on to the next handler. Once a request is handled, the chain ends. Since there is no longer a need to pass on the request.
It is also possible that the request doesn’t get handled by any of the handlers. Since each handler can handle 0, 1 or many requests of different types.
See the full tutorial here.
Console output:
#cpp#coding#programming#gamedev#indiedev#tutorial#visual studio#software#software design#software development#game development#design patterns#cppprogramming
20 notes
·
View notes
Text

(Lying through gritted teeth) I love learning how to use Ren'py
#coding#game dev#Ren'Py#Python#They should be more clear that you have to download an extension for visual studio code to be able to understand your text#because I wasted so many hours trying to follow general python tutorials#Test Novel
3 notes
·
View notes
Text
We have many episodes on using Visual Studio and making games in C++, but how about setting up Visual Studio from scratch?
youtube
#shawnthebro#ue4#unreal#stb#tutorial#youtube#unrealengine#unrealtutorial#unrealengine4#programming#ue5#unreal engine#unreal engine 4#unreal engine 5#visual studio#vs#vs code#visual studio code#c++#code#ide#ide with unreal#visual studio with unreal#code with unreal#unreal code#c++ unreal#unreal c++#unreal engine tutorials#code tutorials#tutorials
0 notes
Text
Crea tu primera página web en HTML5: Guía paso a paso para Windows y macOS
¿Quieres dar tus primeros pasos en el mundo de la programación web? ¡HTML5 es el lenguaje perfecto para comenzar! En esta guía te mostraremos cómo crear tu primer documento HTML5 tanto en Windows como en macOS. ¡Descubre lo fácil que es dar vida a tus ideas en la web! ¿Qué es HTML5? HTML5 es el lenguaje estándar para estructurar el contenido de las páginas web. Es la base sobre la que se…
#alicante#comunidad valenciana#crear página web#desarrollo web#editor de código#html5#macOS#Notepad++#Sublime Text#tutorial#Visual Studio Code
0 notes
Text
#How to Install and Setup VS Code in Ubuntu 20.04 LTS#install visual studio code ubuntu 20.04 command line#install vscode ubuntu 20.04#Step By Step Tutorials
0 notes
Text
Task Manager App: Effortlessly Develop One
Create a Task Manager app using C# WPF and the MVVM pattern. #WPF # Tutorial #MVVM #C-Sharp #Development #Developer #CoderTrend
Using C#, WPF and the MVVM architecture to create a stunning and Useful Task Manager Application Welcome to our comprehensive series where we delve into the creation of a sophisticated Task Manager application using WPF (Windows Presentation Foundation). This journey is not just about building an application; it’s an exploration into the robust capabilities of C# and WPF, crowned with the…

View On WordPress
#.NET Development#Advanced C Techniques#C Programming#Code Efficiency#Coding for Beginners#Desktop Application Development#Model-View-ViewModel#MVVM Pattern#Scalable Software Design#Software Architecture#Task Manager App#UI/UX Design#Visual Studio Tips#Windows Application Development#WPF Tutorial
0 notes
Text
INSTALAR PERFIL HTML+CSS EN VISUAL STUDIO CODE
Los perfiles en VSCode nos permiten guardar y cambiar entre diferentes conjuntos de preferencias y configuraciones. Esto permite cambiar fácilmente entre entornos de desarrollo sin tener que ajustar manualmente la configuración.
En este curso vamos a trabajar principalmente con HTML y CSS, por lo que si queremos la configuración más optima para trabajar con estos lenguajes tenemos la opción de instalar este perfil siguiendo estos pasos.
1. Ir a https://gist.github.com/BartolomeSintes/7290b128a95f302d47a45e189236ce1a 2. Copiar el link de la página: "https://gist.github.com/BartolomeSintes/7290b128a95f302d47a45e189236ce1a". 3. En Visual Studio Code ir a Ajustes (el engranaje)>perfiles>importar perfil 4. Pegar el enlace copiado en la barra que nos aparece en VSCode y dar a enter. 5. En el explorador de Visual Studio Code le damos a Crear perfil. 6. Crear.
Cada uno tiene sus preferencias a la hora de establecer el orden y configuración de su espacio de trabajo. Si no nos convence como funciona un perfil siempre podemos eliminarlo, cambiarlo por otro o configurar VSCode manualmente. Este tutorial solo es para explorar una de las muchas funcionalidades que nos ofrece VSCode para su personalización.
Para un tutorial más detallado y con imágenes----> ir a mclibre
0 notes
Text
How cutiesai made 14 Days With You
I've received quite a few requests in the past asking how I made 14DWY, what resources I used, how I organised my lore, etc. — so I figured I'd make one big post and share it with everyone else as well! It features a buuunch of helpful stuff I wish I'd known when I first made 14DWY, so hopefully this will help others too!
⚠ This is all copied & pasted from a Discord post I made back in early 2024! I'll also be adding to it over time, so feel free to check back every so often! ^^

What engine do I use?
14DWY uses the Ren'Py engine!
There are two preinstalled games (called "Tutorial" and "The Question") that give you a basic rundown on how to use the program!!
Zeil Learning's video called "Ren'py Tutorial For Beginners" is also a good place to start for those who have no idea where to begin with Ren'Py!
I also really recommend these Ren'Py resources:
Lemma Soft Forums
Ren'Py Discord server
Ren'Py subreddit
Zeil Learnings, ElaineDoesCoding, Visual Novel Design, and Ess Ren'Py Tutorials on YouTube
Searching through the "Ren'Py" tag on itch.io for community-made assets and resources (make sure to give credit if you use someone's asset(s))!
Feniks and Wattson offer some really helpful stuff!!
Not Ren'Py related, but helpful for creating a VN:
Obsidian and Notion for planning and worldbuilding
Visual Studio Code and Atom (comes preinstalled with Ren'Py iirc?) for scripting/coding
Pixabay and Pexels for royalty-free images and stock photos
DOVA-SYNDROME for music
Clip Studio Paint (paid) and Krita (free) for drawing
Toyhou.se to store your littol guys (If you need an invite code, I have over 300 to give away lmao ^^ Send in an ask to @cutiesigh if you'd like one!)
An itch.io account to upload your game for free and share it with others
General tips to keep in mind:
Make games for fun, not for fame. Too often, I see new developers create VNs with "trending tropes" because they see how successful it is and want the same level of popularity. As harsh as it sounds, this only makes your game feel hollow and superficial, and players will notice.
When using Ren'Py, it's better to have multiple .rpy files rather than putting everything into one large file!! It makes organising and finding things easier, and if something gets corrupted... at least you won't lose everything!
Plan everything beforehand, but give yourself room to expand and implement new ideas.
Start small and slowly expand over time. Don't start off with an overly ambitious project, as it can be disheartening when you put all this effort into something just for it not to gain any traction. Also, be grateful for your earliest supporters, as they're the ones who will lift your project off the ground!!
This is a personal preference, but I recommend starting off with itch.io as your main distribution platform. Most storefronts take a cut from your donations and revenue, and sites like Steam require a $100 fee just to publish your game on their platform. Itch is free, and you can even toggle off revenue sharing in your profile settings! (I like to keep it at 10% though, because I'm grateful for everything the site provides ♡)
If you ever need help with Ren'Py, you're always welcome to join the 14DWY Discord server and ping me in the help channel!
450 notes
·
View notes
Text
!!! my tag system is below all of this,,, I moved it under a cut because people reblog this post for the links :P
edit: thx for the love on this post. im going to try and continually update this!

⇩ ⠀sites FULL of web graphics ⇩
blinkie maker : make your own blinkies!
DOLLZ REVIVAL : a revival of pixel dolls where you can create and share your own. very cute!
GlowTxt : create glowing transparent text gifs that say whatever u want
HOARDER'S PILE : contains blinkies, buttons, stamps, and teddies
plasticdino.neocities.org : blinkies
Glitter Graphics : contains gifs, blinkies, dividers, and just sooo many web graphics
Cute Kawaii Resources : contains gifs, blinkies, stamps, favicons, dividers, buttons, fonts, literally everything you need. its an insane resource
Adrian's blinkie collection : collection of blinkies, stamps, and buttons
☆ (supplies.ju.mp) : blinkies, stamps, buttons, & favicons
twigbranch.carrd.co : blinkies
lallys.carrd.co : blinkies, stamps, dividers, and other resources
Bugleeblinkie.carrd.co : blinkies, and 3 very special gifs at the end ;)
unshinesblinkies.carrd.co : blinkies
The 88x31 GIF Collection : buttons. there are 5 parts! huge collection!
Bonnibel's Graphic Collection : blinkies
WELCOME TO GIFCITY : blinkies, dividers, favicons, stamps
cass-tastrophe.carrd.co : blinkies, stamps
kotatsuOS : blinkies
Cute web graphics : blinkies, stamps, dividers, and a LOT of other graphics, all very cute
⇩ some html tools! + tags below cut ⇩
MDN (mozilla.org) : if you're just starting out like me this is super helpful HTML Tutorial (w3schools.com): same here! (offers other programming languages as well!) Accessibility Checker(Free Scan) : a site you can use to check accessibility/ADA compliance when making your website! it will point out what needs to be changed. it is free, but they also offer paid services if you need more help imagecolorpicker.com : hex code picker. i use this one because you can upload an image, paste clipboard, OR type in the website and it'll grab a screenshot for you! something simple that was made really well. cssgradient.io : helps you make css gradients for backgrounds or whatever else you need them for smartgb.com : a free guestbook service FC2 Counter! : free "site visits" and "online now" counters. fully customizable Unclosed Tag Checker by Alicia Ramirez : does as it says, checks for unclosed tags (although I recommend using a program that does this as you write anyways. I use Visual Studio Code. Status Cafe : an updateable and embeddable status that you can stick anywhere on your site! it is mostly customizable with CSS but I have noticed a few small quirks with it
my tagging system :))
#graphics
#blinkies
#stamps
#buttons
#dividers
#html/css
#resources
#code
e10's web (neocities.org) <- shameless site plug. show it some love :P
#blinkies#stamps#favicons#gifs#old web graphics#old web aesthetic#old web stamps#old internet#old web#old webcore#2000s web#90s web#html#html css#html5#css#htmlcoding#web design#web resources#early web#early internet#neocities graphics#neocities#geocities#gifcities#web graphics#webcore
547 notes
·
View notes
Text
A new script mod by fantuanss12!

I got to test this mod out and it's another fun but more interactive way of buying groceries! - desiree-uk fantuanss12! mod notes:
What does this mod do:
This mod added a grocery delivery service. Shop and wait until a delivery sim come with a bag. Accept delivery and open the bag, Get the items inside it.
How to use:
There are two way to access this service: 1. Select grocery store rabbit hole --> Request Grocery Delivery Service -Combo rabbit hole will be in Grocery Store... Pie menu
2. Select cellphone or home phone --> Services... --> Call for Grocery Delivery -If there's multiple grocery stores, a dialog will pop up and ask to select one -Can't shop if there's no grocery store in the world
Shop as usual and buy items. Wait until a delivery service sim come and ring the doorbell. Accept it like pizza delivery service. Sim will be charged 30 simoleons for the service.
The grocery bag is from The Sims 4 Cottage Living.
Others:
If the delivery didn't come:
-Use MasterController to check whether there's 4 pizza delivery service sim. Two for pizza, two for grocery (Game needs time to generate sims to fill the spot)
-Since the delivery system is almost the same as pizza delivery, try to order pizza to see whether they can reach the lot.
-There's report that in worlds with no roads, service sim may not show up but the grocery bag is somewhere around the lot. Try to search around the house.
Credit: Big thanks to twinsimming for phone coding help! Simmers on Discord and tumblr for testing Battery's script mod template CmarNYC's SimOutfitter tool ILSpy Visual Studio 2022 Multiple modder's tutorial. EA for the bag
Download from MTS!
366 notes
·
View notes
Text
Edgaring time!
Tutorial on how to make your own responsive Edgar :D I will try to explain it in really basic terms, like you’ve never touched a puter (which if you’re making this… I’m sure you’ve touched plenty of computers amirite??? EL APLAUSO SEÑOOOREEES).
If you have some experience I tried to highlight the most important things so you won’t have to read everything, this is literally building a website but easier.
I will only show how to make him move like this:
Disclaimer: I’m a yapper.
Choosing an engine First of all you’ll need something that will allow you to display a responsive background, I used LivelyWallpaper since it’s free and open-source (we love open-source).
Choosing an IDE Next is having any IDE to make some silly code! (Unless you can rawdog code… Which would be honestly impressive and you need to slide in my DMs and we will make out) I use Visual Studio!!!
So now that we have those two things we just need to set up the structure we will use.
Project structure
We will now create our project, which I will call “Edgar”, we will include some things inside as follows:
Edgar
img (folder that will contain images) - thumbnail.png (I literally just have a png of his face :]) - [some svgs…]
face.js (script that will make him interactive)
index.html (script that structures his face!)
LivelyInfo,json (script that LivelyWallpaper uses to display your new wallpaper)
style.css (script we will use to paint him!)
All of those scripts are just literally like a “.txt” file but instead of “.txt” we use “.js”, “.html”, etc… You know? We just write stuff and tell the puter it’s in “.{language}”, nothing fancy.
index.html
Basically the way you build his silly little face! Here’s the code:
<!doctype html> <html> <head> <meta charset="utf-8"> <title>Face!</title> <link rel = "stylesheet" type = "text/css" href = "style.css"> </head> <body> <div class="area"> <div class="face"> <div class="eyes"> <div class="eyeR"></div> <div class="eyeL"></div> </div> <div class="mouth"></div> </div> </div> <script src="face.js"></script> </body> </html>
Ok so now some of you will be thinking “Why would you use eyeR and eyeL? Just use eye!“ and you’d be right but I’m a dummy who couldn’t handle making two different instances of the same object and altering it… It’s scary but if you can do it, please please please teach me ;0;!!!
Area comes in handy to the caress function we will implement in the next module (script)! It encapsulates face.
Face just contains the elements inside, trust me it made sense but i can’t remember why…
Eyes contains each different eye, probably here because I wanted to reuse code and it did not work out and when I kept going I was too scared to restructure it.
EyeR/EyeL are the eyes! We will paint them in the “.css”.
Mouth, like the eyeR/eyeL, will be used in the “.css”.
face.js
Here I will only show how to make it so he feels you mouse on top of him! Too ashamed of how I coded the kisses… Believe me, it’s not pretty at all and so sooo repetitive…
// ######################### // ## CONSTANTS ## // ######################### const area = document.querySelector('.area'); const face = document.querySelector('.face'); const mouth = document.querySelector('.mouth'); const eyeL = document.querySelector('.eyeL'); const eyeR = document.querySelector('.eyeR'); // ######################### // ## CARESS HIM ## // ######################### // When the mouse enters the area the face will follow the mouse area.addEventListener('mousemove', (event) => { const rect = area.getBoundingClientRect(); const x = event.clientX - rect.left; const y = event.clientY - rect.top; face.style.left = `${x}px`; face.style.top = `${y}px`; }); // When the mouse leaves the area the face will return to the original position area.addEventListener('mouseout', () => { face.style.left = '50%'; face.style.top = '50%'; });
God bless my past self for explaining it so well, but tbf it’s really simple,,
style.css
body { padding: 0; margin: 0; background: #c9c368; overflow: hidden; } .area { width: 55vh; height: 55vh; position: absolute; top: 50%; left: 50%; transform: translate(-50%,-50%); background: transparent; display: flex; } .face { width: 55vh; height: 55vh; position: absolute; top: 50%; left: 50%; transform: translate(-50%,-50%); background: transparent; display: flex; justify-content: center; align-items: center; transition: 0.5s ease-out; } .mouth { width: 75vh; height: 70vh; position: absolute; bottom: 5vh; background: transparent; border-radius: 100%; border: 1vh solid #000; border-color: transparent transparent black transparent; pointer-events: none; animation: mouth-sad 3s 420s forwards step-end; } .face:hover .mouth { animation: mouth-happy 0.5s forwards; } .eyes { position: relative; bottom: 27%; display: flex; } .eyes .eyeR { position: relative; width: 13vh; height: 13vh; display: block; background: black; margin-right: 11vh; border-radius: 50%; transition: 1s ease } .face:hover .eyeR { transform: translateY(10vh); border-radius: 20px 100% 20px 100%; } .eyes .eyeL { position: relative; width: 13vh; height: 13vh; display: block; background: black; margin-left: 11vh; border-radius: 50%; transition: 1s ease; } .face:hover .eyeL { transform: translateY(10vh); border-radius: 100% 20px 100% 20px; } @keyframes mouth-happy { 0% { background-color: transparent; height: 70vh; width: 75vh; } 100% { border-radius: 0 0 25% 25%; transform: translateY(-10vh); } } @keyframes mouth-sad { 12.5%{ height: 35vh; width: 67vh; } 25% { height: 10vh; width: 60vh; } 37.5% { width: 53vh; border-radius: 0%; border-bottom-color: black; } 50% { width: 60vh; height: 10vh; transform: translateY(11vh); border-radius: 100%; border-color: black transparent transparent transparent; } 62.5% { width: 64vh; height: 20vh; transform: translateY(21vh); } 75% { width: 69vh; height: 40vh; transform: translateY(41vh); } 87.5% { width: 75vh; height: 70vh; transform: translateY(71vh); } 100% { width: 77vh; height: 90vh; border-color: black transparent transparent transparent; transform: translateY(91vh); } }
I didn’t show it but this also makes it so if you don’t pay attention to him he will get sad (mouth-sad, tried to make it as accurate to the movie as possible, that’s why it’s choppy!)
The .hover is what makes him go like a creature when you hover over him, if you want to change it just… Change it! If you’d rather him always have the same expression, delete it!
Anyway, lots of easy stuff, lots of code that I didn’t reuse and I probably should’ve (the eyes!!! Can someone please tell me a way I can just… Mirror the other or something…? There must be a way!!!) So now this is when we do a thinking exercise in which you think about me as like someone who is kind of dumb and take some pity on me.
LivelyInfo.json
{ "AppVersion": "1.0.0.0", "Title": "Edgar", "Thumbnail": "img/thumbnail.png", "Preview": "thumbnail.png", "Desc": "It's me!.", "Author": "Champagne?", "License": "", "Type": 1, "FileName": "index.html" }
Easy stuff!!!
Conclusion
This could've been a project on git but i'm not ready and we're already finished. I'm curious about how this will be seen on mobile and PC,,, i'm not one to post here.
Sorry if I rambled too much or if i didn't explain something good enough! If you have any doubts please don't hesitate to ask.
And if you add any functionality to my code or see improvements please please please tell me, or make your own post!
98 notes
·
View notes
Text
Coding tutorial: Observer pattern
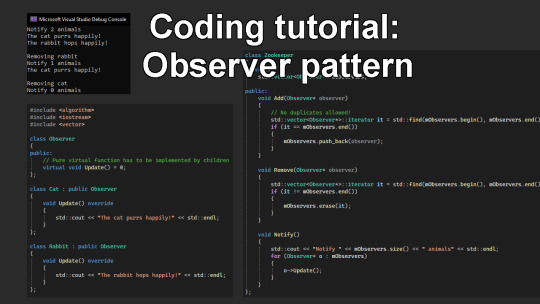
The observer pattern has an object named the ‘subject’ which maintains a list of ‘observers’. The subject will notify all the observers when an event occurs. The observers can then choose how they wish to respond to the event.
In this tutorial you will code a zookeeper and animals. The zookeeper represents the subject of the observer pattern. Whilst the animals represent the observers.
The zookeeper will notify the animals when he arrives, and the animals will respond in there own unique way.
To follow along to this tutorial, you can either just read it and apply the knowledge to your programming language. Or you can use Visual Studio, by creating a solution, then create a project with a console application. Then run the project to see the output in the console window.
Walkthrough and full code example on the blog:
#cpp#programming#coding#gamedev#indiedev#visual studio#tutorial#software#software design#software development#design patterns
24 notes
·
View notes
Text
Pinkify your programming! 💗

As a fellow programmer and self-proclaimed ‘aesthetic pink coding’ girl (inspo from @bluehairedphase's post), I wanted to create a post about how you can add pink to your programming experience~!
In my previous post, I talked about the significance of not feeling ashamed of loving pink and cute things, but rather, embracing them wholeheartedly. There's no better feeling than being true to yourself and showing the world that programming can be both powerful and hella pretty!

Choose a pink-themed code editor: tutorials for Visual Studio Code and Visual Studio
Set a pink wallpaper on the computer: why not?
Customize your code syntax highlighting with pink colours: I especially do this on VSCode and Replit!
Wear pink-themed clothing or accessories: This is more targeted to me because I wear pink to work!
Create pink-themed coding projects! Well... of course?
Share your pink coding projects with others: so we can also get some inspiration!
Use pink coding stickers on your laptop/desktop: My fiance bought my laptop stickers and I love them!
Decorate your coding workspace with pink elements: I have a lot of my plushies, my water bottle, stationery etc on my desk at home and at work!
Write cute code comments to add flair: I use heart symbols and cute text faces in my personal projects’ code!
Use pink labels for your coding files and folders: I use custom folder icons that are pink-themed!
Since when did you care about what people think about you on something like this? Have fun programming, and do it in style! (ෆ˙ᵕ˙ෆ)♡
You're not doing too much, you're being you and making yourself happy! This is all fun and just makes programming more enjoyable, in my experience! I hope this helps other ‘aesthetic pink coding’ girlies on here! 😋🙌🏾💗
#codeblr#coding#programming#progblr#studyblr#studying#comp sci#tech#programmer#coding tips#codeblr girl goals#codeblr pink girl
318 notes
·
View notes
Note
Should I learn emacs I've been coding in nano
@perl-official
I always recommend emacs. But depending on your use case you might want to learn something else first.
If you hop between different servers a lot and can't expect to have access to your favourite editor on there, I recommend learning the basics of vi/vim since that is preinstalled pretty much everywhere. Also, most bigger IDEs you might use in the future have a setting or extension to use vim-keybinds.
If you just want to program on your own machine, I recommend trying out a few different text-editors and then decide on one.
To learn emacs, I recommend using the built in tutorial. You can access it using C-h t (thats CTRL-h followed by t) while beeing in emacs.
To learn vim, you can use the vimtutor. I think it is automatically installed with vim on most distros, but may have to be installed separately on some. Also neovim/nvim is way better in term of extensibillity to regular vim
Other Editors you could try:
- VS Codium (Visual Studio Code fork that removed most Microsoft Stuff)
- helix - a Vim like Editor
- zed - way too fucused on AI features for my taste but I heard it has some other nice features
If you want some more infos on why emacs is great: here two semi serious posts I made in the past:
Pingin some people who also might have something to say:
@vim-official @helix-editor @emacs-evil-mode
25 notes
·
View notes
Note
I’m a little curious , what do you use for making a VN? Any tutorials you used and any tips or comments?
I use a program called renpy alongside with visual studio code!🫶
As in tutorials Zeil Learnings on youtube has saved me, even google is a great help (for the costumized pronouns as an example, I just looked up how to code them and followed the scripts people wrote down).
I use clipstudio paint and procreate for the drawings, as a tip I could say that you can use procreate or any drawing or editing app to visualize how you want your game's aesthetics to look like before actually coding it; add the background, then the characters and a textbox that you can costumize however you want, once you like it enough you can settle with that <3.
I don't make the backgrounds myself, I get them from Uncle Mugen, literally such AMAZING free resources (ofc I'll credit them on the itch.io page). The most important thing is that you have fun writing the story and creating the game, see it as a personal achievement and try not to compare yourself too much to others, remember that YOU are the creator, you know how everything goes so you won't get the same thrill as someone who plays it for the first time without knowing the entire lore. (I should listen to my own advice for this HAHDHAH)
24 notes
·
View notes
Text
just realized that i never mentioned that i know how to code websites and vaguely know how to code in C because i took a class from Harvard, as well as classes at my university
in case you're interested in learning HTML and CSS, my web design class literally gave us these websites to use because it has almost everything:
CSS Tricks - An entire website just for CSS
HTML Tutorial - A webpage about HTML
CSS Tutorial - A webpage about CSS
Markup Validator - Makes sure your code is right
also, i recommend using Visual Studio (if you have Windows) or Visual Studio Code (if you have anything other than Windows, or if you want to do more than just HTML)
#random#random thoughts#thought this was cool to know about me#fun fact about me#ig#and honestly#coding in html and css is literally so easy#i first learned in a computer class in middle school and i made a whole ass website#i highly recommend html for anyone that wants to start learning more about computer languages#although i always found css to be a bit more difficult to figure out#but i think that is just a me problem#html#html css#htmlcoding#html5#css#html5 css3#frontend#code
6 notes
·
View notes